6. Users Settings
Section Overview
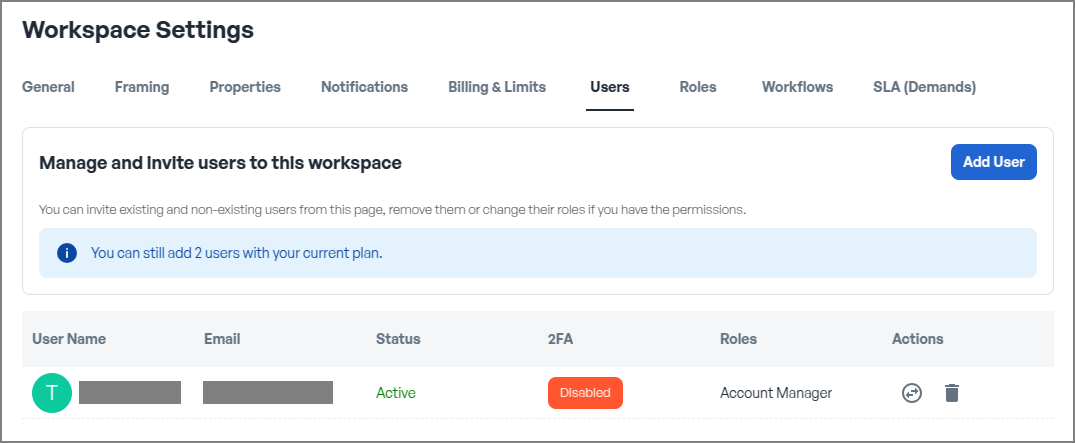
The Users section enables you to efficiently manage users within the CSFaaS platform, ensuring streamlined access control and organisational alignment.
This section offers tools to track, view, manage, and control user accounts, providing transparency and accountability across your cybersecurity framework.
Why Effective User Management Matters
Proper user management is essential for:
- Enhanced Security: Ensuring only authorised individuals have access to sensitive data.
- Operational Efficiency: Aligning roles and responsibilities with organisational objectives.
- Accountability: Clear visibility into user actions and role assignments.
The Users Section offers full control over user accounts, ensuring access and permissions align with your organisation’s security policies and operational requirements.
Key Capabilities in the Users Section
- Track Registered Users: Monitor the number of registered users and gain an overview of their general information, including status and roles.
- View User Details: Access detailed information such as username, email, status, and assigned roles.
- Manage Roles: Modify existing user roles or assign new roles to ensure proper access and responsibility alignment.
- Invite New Users: Seamlessly invite new members to join your workspace and participate in your security processes.
- Remove Users: Revoke user access and remove accounts when they are no longer required.
Invite a User
Inviting a user to your workspace is a simple and secure process:
- Click on the "Add User" Button: Locate and click the blue "Add User" button in the Users section.
- Enter User Details: Provide the user's email address and assign them a role based on their responsibilities.
- Send the Request: Click on "Send Request" to finalise the invitation.
- OTP Authentication: An OTP (One-Time Password) will be sent to the user's provided email address. The user must use this OTP to verify their account and complete the onboarding process.
This streamlined invitation process ensures secure account creation and maintains integrity across your workspace.
Define a Role for the User
Assigning or modifying roles for a user is simple:
- Locate the User: Navigate to the user whose role you want to define in the Users section.
- Click the "Change Role" Action Button: Select the "Change Role" option next to their name.
- Assign Roles: Check the box for each role you want to assign to the user.
- Save Changes: Confirm and save your selections to finalise the role definition.
This feature ensures each user has the appropriate permissions and responsibilities aligned with their role within your organisation.
Remove a User
To remove a user from your workspace, follow these steps:
- Locate the User: Find the user you wish to remove in the Users section.
- Click the Trash Icon: Click on the trash icon next to their name.
- Confirm the Action: A confirmation prompt will appear. You must confirm the removal to complete the process.
Removing a user is permanent, so carefully review your decision before confirming. This action ensures your workspace remains secure and access is appropriately managed.